June 9, 2011

Modern vs. Traditional Roofing

After almost a month of dealing with business in New York, I'm back on the roof here in London. It's been good to have some time away, but the goal for these next few weeks will be to finish the roof and finally get the scaffolding taken down.

The first thing I'd like to get done is the roofing on the flat portion of the new dormer's roof. I'm doing this first to minimize the exposure to the weather of the new (waterproof) WBP plywood substrate which had been put down before I went back to NYC.

June 7th - the plywood substrate
The flat roof brings up an interesting discussion on the technology differences between flat roofing (which is a modern concept) and sloped roofing (which is the traditional way of building). Flat roofing only really started coming into use in the 1920's with the advent of modernism. Flat roofs have always been difficult to maintain, as they often leak - one early well-known use of a flat roof was by Le Corbusier in the Villa Savoye, which apparently started leaking as soon as the family moved in. Part of reason for this is that without a significant slope, water is not immediately drained from the roof surface, as it is in a traditional sloped roof - flat roofing relies on the chemical nature of the membranes and very slight, 2-3 degree slope to avoid water penetration.

Fortunately the technology has improved dramatically since then - these days, flat roofing products are petroleum-based membranes that are waterproof, like asphalt or modified bitumen. But they are sticky, smelly, and generally nasty! You're basically sticking together several layers of this (toxic) stuff to create the waterproof surface. Whereas the slates on the sloped roof rely on gravity to pull water down onto overlapping layers of natural (or artificial) stone that create an impermeable layer with very simple, but highly effective technique.

From a design standpoint, I much prefer flat roofs because of the freedom they provide in developing the form of a building. But from a hands-on construction standpoint, I find the slates a much more elegant and environmentally-friendly system. The biggest irony is that modern flat roofing membranes can last upto 30 years if properly installed and maintained, whereas slates roofs can last upwards of 300. So much for modern technology...

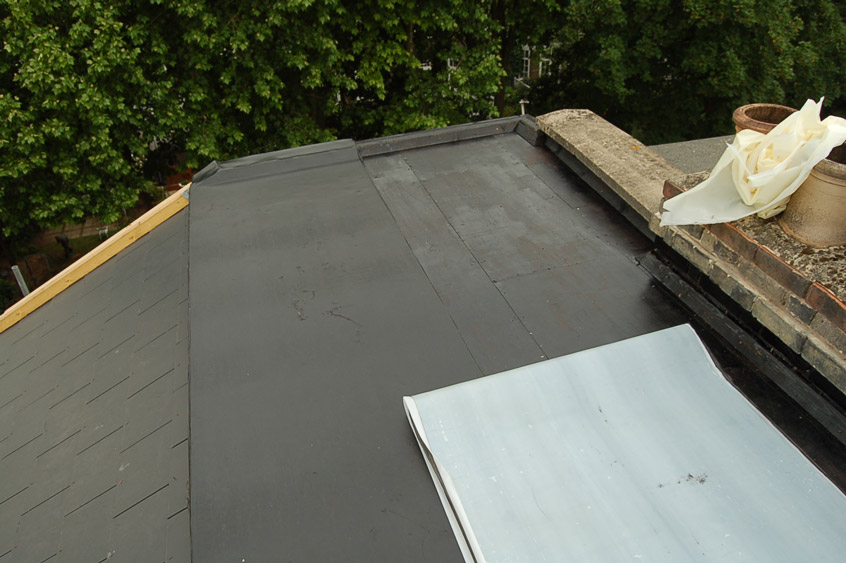
However, in this case we didn't actually have a choice: we had to use a flat roof on our dormer because otherwise we would not have been able to stand up inside, due to the height and design restrictions imposed by the Planning Dept (which are more onerous because we're in a historical conservation district). As a result, we needed both a sloping slate roof, and a flat modified bitumen roof. Going into this, I had not really considered the issues and detailing involved with having both systems adjacent to each other - particularly the flashing that spans both systems.
Working out the details in my sketchbook
After much thought, sketching and research, I developed several details how to do this (after not finding any details anywhere). With the new details in hand, it was time to start the flat roofing:
June 7th - one of the new flashing details. The plywood overhangs the last slate, and lead covers the joint. The top of the lead is held by a batten that will be covered by the waterproof membrane
June 9th - Applying the primer for the two layer roofing system.
Fully Primed
Rolling out the 1st layer, which has a sticky bottom side that adheres to the primer.
One roll adhered and starting the second
The protective paper removed from the 2nd roll, ready to be attached to the primed plywood.
Running the 1st layer up the brick wall.
A roll of the cap-sheet (the top layer)
The cap sheet wraps around the batten to provide a drip-edge for the flat roof, and to make the edge waterproof.
With the edge finished, the 1st roll of cap-sheet is laid-out
Half the cap sheet installed - it also has a protective paper that is removed to expose a sticky surface that adheres to the bottom layer.
Doing the 2nd roll.
The details along the wall are tricky and time consuming.
Wall details finished - they will be covered with a lead flashing.
The finished flat roof!

June 4, 2011

Homecoming?

I'm just back from a week in New York. It was 25 degrees (C) in NYC, with gorgeous sunshine, and I arrived back in London and it was 12 degrees and pouring rain. And after staying in a proper flat/home for the past week (with a kitchen! And a real bed! And hot water! And...), I returned to the construction site and "the Box".


But...astonishingly - "the Box" feels like home. And, amazingly - I found myself happy to be back, and in fact not really missing any of the "creature comforts" (well, by most normal standards, basic amenities?!) at all !


Let's hope that lasts - André joins me here in a few days, and we're in for another couple of weeks of hard work...

May 10, 2011

Trying It On For Size...

...where the "It" in question is our kitchen!

Today Andre built a mock-up of the "outline" of the kitchen - basically some massive long pieces of wood cut to the correct dimensions, just to frame out the space so we can see (more or less) how it will feel, space-wise. He added some plywood board to serve as the "countertop". I know it doesn't look remotely like a kitchen, but it's the wooden thing at the top of the stairs, in front of "the Box".


Like when we did the trial walls for the bathroom, I was really chuffed with the notion that we could trial the dimensions of the kitchen. As it happened, we thought the size of the kitchen space was fine, but we were both surprised to discover the extent to which we felt it "stuck out" and ate into some of the open space. I guess we've just gotten used to having one big, all-purpose space... and no kitchen.

The mock-up doesn't give us an exact approximation (oxymoron??!) of how the space will feel because right now you have to walk through the "kitchen" to enter the "bedroom" (aka, the Box), whereas when we really build it, we'll be extending the floor at the top of the stairs and the bedroom door will be somewhere over there. But at least it's a step - albeit a small one - towards turning this construction site into something resembling a proper home!

The building of the mock-up also rekindled an ongoing debate about open-plan spaces. In a nutshell: Andre loves them, and I don't! Suddenly, standing in the "kitchen", it hit home that our new dwelling is going to be well and truly open plan... and I wasn't too happy. I have always maintained that the kitchen should be separate from the living area (and everything else)... but I also understand that given the space constraints in this flat, and also the fact that the design was in large part driven by our very special ceiling and the loft extension, we don't have a lot of choice now. In fact, we have no choice! If we build walls to enclose the kitchen, I can see that it will ruin the whole effect created by the ceiling. Maybe I can convince Andre to come up with some sort of sliding screen thing...


May 9, 2011

Finishing Something (finally!)

It's great to finally be able to say something (anything!) is finished!

Over the last two working days, I managed to use the remaining slates (still have not received the delivery of new ones) to finish the main roof slope (faces east / side of the building). Finishing this side required doing another corner (see the post on slating the first corner) and then cutting the top row of slates along the edge of the flat roof. All of this proved to be rather time consuming as almost every tile had to be individually measured and cut. Again, I had been avoiding doing the corner...but I realized it would not be possible to finish the flat roof without these slates in place. Fortunately I did not run out of slates, but at this point, I think I only have 8 left, so hopefully my order will be delivered tomorrow so I can finish placing all the slates before leaving on Wednesday...

May 7th - Saturday morning. Another dreaded corner awaits
The first row finished, and starting the second
Halfway up
Saturday work hours stop at 2pm - so stopping here
Monday May 9th - a few more rows
The last few rows
The top row - each slate had to be individually measured, cut and drilled.
The last slate on the top row
The finished corner!
Montage of finished side

May 6, 2011

"Flashing" the Roof

No, it's not what you think... Flashing in the building world is fairly mundane - not a trench-coat in sight... Anyway - flashing is a waterproofing element that typically prevents water from seeping in between the joint of a roof and a wall. It's actually quite tricky because water is a rather mischievous thing and is the scourge of buildings, builders and architects everywhere. In a brick building with a sloped roof the flashing is even trickier because one has to put it at an angle and then cut openings in a step-like pattern in between the bricks for a single sheet of lead to be inserted into. That lead wraps over another element that is typically coming from the roof itself and when they are combined, water can't get in (almost like a yin/yang arrangement). It's a very meticulous and time-consuming process and if you're slightly off with your measurements & cuts it won't fit (as I found out the hard way) It's probably easier to explain with the photos:
May 3rd - The step-like openings between the bricks and the ends of the waterproof membranes
Before cutting the steps into the lower half of the wall (a dirty, messy job)
A piece of flashing (known as "Code 4") that is being cut after the measurements made
The lead flashing in place to verify the cuts are correct (if it's slightly off, it won't work as I discovered)
Bending the lead into the correct shape (playing with lead is kinda fun)
The finished piece of lead flashing
The lead put into place overlapping membranes and the "soakers". Soakers are small 10" pieces of bent stainless steel (shaped like an "L") that site between the slates and prevent water from getting in. The edges of the lead are tucked into the brick openings and wedged into place.
May 4th - The flashing at the bottom with the "soakers" and membrane exposed above
Now that area has its flashing
May 5th & 6th - Around the corner and almost at the top. Here, a chemical patina has been applied which prevents the lead from discoloring and staining the slates.

May 4, 2011

Slating the "Dark"Side

The "Dark" side is the north side of our roof. With the repointing completed, the next stage involved putting down the slates and doing the flashing. The flashing is described in the next post, but it happened more or less simultaneous with putting down the slates as I realized (the hard way) that one needed the slates in place to accurately do the flashing. So rather than bang out all the slates as I had hoped, they were put down in stages that were mostly geared around doing the flashing.

I ended up starting to slate along the brick wall on the morning of May 3rd, but after a few hours realized that it needed to come down due to a rather annoying corner and stepping out of the brick a few feet up. The problem was that I had not aligned the slates to that stepped-out face, and the way I had originally done it, the slates beyond that point would be so narrow (like, an inch) that they would probably fall apart over time. So I basically wasted that morning, but re-doing it was probably the right move.

I had been hoping that this side of the roof would be easy and fast, but it has turned out to be anything but, taking two days for the slates and several days for the flashing and re-pointing. To top it off, I started to run out of slates...maybe the "Dark" side is an appropriate name after all...

May 3rd - the first attempt of laying down the slates in the morning
After taking them off...
The redone slates with the first piece of flashing in
May 5th - Morning

The first course of slates in place

Second course down

A few more rows

Starting to run out of slates

The stopping point at the end of the day

April 28, 2011

Repointing (is annoying!!)

It's the last day of a short (3 day) week here in London because of the Royal Wedding tomorrow and the bank holiday on Monday. As a result I decided to to do the re-pointing of the brickwork along our party wall, figuring it would be a simple, one-day job, and necessary to do before moving forward with the flashing (see next post).

Re-pointing is when you remove some of the old (often cracked) mortar between bricks and then put new mortar back. The first step is to remove the old mortar - this is usually done with a small angle grinder that cuts out the old mortar. Once that's done, the open joints are cleaned, the bricks are moistened, and the new mortar is put into the joints. Once the mortar has dried a bit, it can be finished in a number of different styles.

The brick wall
The old, deteriorated and missing mortar joints
This all sounds fairly straight forward (to me at least), but it's a tedious, time consuming and messy job. As i was researching online the correct way to do this, I came across a web page where the guy said something along the lines of: "I find re-pointing meditative, but it's not for everyone. If you don't find it meditative, then it's probably best you don't do it yourself." Turns out he was right...I definitely did not find it meditative!

The cleaned and cut-out joints (after using the grinder)
Cutting the mortar is messy and you end up completely covered in dust. As if that was not enough, pointing the bricks with new mortar is much harder than it looks. One is actually not supposed to get it onto the face of the brick as it may stain...but as you can see that's exactly what I did!

The new mortar in the upper joints, old mortar below
Cut & cleaned out joints
Yours truly placing mortar in the joints
The finished joints
Perhaps today I did not have my usual patience, or felt rushed to get it done, but regardless, I learned that re-pointing is just not something I'm good at, or enjoy doing. Fortunately it's a small wall and I did not have to do too much, but it still took all day...

The completed wall