June 22, 2011

Ridge Tiles - Learning the Hard Way

With the roof slates done, the first item on the list of things to be finished before the roof is complete is the installation of the ridge tiles. These are triangular shaped tiles that cap the intersection between each side of the roof, known as a ridge. With the slates completed, it's the only area still vulnerable to water penetration - so it should be tackled first. It's also probably the last "large" job - all the other items on the list are smaller, less strenuous tasks. That being said, I had no idea how "large" and "strenuous" installing these ridge tiles would be...

Back in March, when I decided to complete the roof myself , it was primarily because it appeared that most of the work ahead involved small, precise tasks - perfect for one person. Over these last few months, that has remained true - until these last three days.

Installing these ridge tiles proved to be the most exhausting work I've encountered so far. It's not that the tiles are heavy, or difficult to lay - it's the combination of all the tasks required at the same time. The primary culprit was mixing the mortar, which in itself is not hard, but it involves carrying heavy bags of cement and sand, mixing pail after pail of the stuff with a shovel, and then finally carrying the heavy pail to where it's needed. Now with the mortar in hand (or more precisely "in trowel") it is placed onto the dampened slates. The ridge tile is then placed onto that heap of mortar - if you happen to be a professional then you're done, if not (like me), you end-up making a mess...the mortar goes everywhere, and you then have to clean it before it dries...

I now understand (the hard way!) how much skill and experience goes into laying bricks or tiles - and how easy the professionals make it look. I also have learned (the hard way!) why making the mortar is usually the job of the most junior tradesman, or day laborer - it's exhausting, unending and dirty work.

...I soon realized that every ridge tile took about a bucket of mortar - so laying even a single tile took a long time...

So, like many other moments of this project, it was time to buckle down and just do it...but if there's ever a next time...I'm definitely getting help - or better yet, a mason...

Morning of June 20 - the "Hip Iron" will hold the tiles in place while they dry
Laying the first bed of mortar. Dampening the slates provides better adhesion of the mortar - this also applies to the ridge slates which are soaked in water (bottom right corner)
The first tile in place - so far so good...
A few tiles into it, I'm getting tired, and it's getting messy. Another reminder of my limited skill with a trowel...
Almost done...
The first corner is completed! As it was early afternoon by this point (and raining) I took a break and moved on to some less taxing tasks for the rest of the day.
The next morning - July 21nd - a long road ahead...
The first two tiles in place
Towards the end of the afternoon a little over halfway there
Looking down - finally starting to feel like progress

Making Mortar: Add sand and cement; mix together dry; add water; mix until a smooth, buttery texture. Repeat...
Nearing the top - a bed of mortar
It's 9pm - have been at this for 11 hours. Finally reached the top and turned the corner - time to call it a day
Morning of June 22rd - laying the tiles along the roof's ridge
The bed of mortar for the last tile - it's starting to rain, so it's good to be finishing
Montage of the completed ridge tiles

June 20, 2011

Reflections on radiators

Before the plumbers started work, I got a crash course in how design decisions affect even things as prosaic as heating systems. I was under the impression that we were just going to re-use the old radiators that had come with the flat (they've been sitting out on the balcony since we demolished the walls, but they're still functional, apparently). But the key design feature of the renovated flat is the double-height ceilings and opened-up spaces. Those features mean that we'll need more heat than if we had just kept the small, boxy spaces--so apparently we have to buy radiators that are more powerful than the old ones in order to keep the greater volume of space warm in winter.

Meanwhile, André hadn't liked the old radiators anyway because they're big and clunky...even I can see that they would sort of detract from the design of the space. I'm sure he was secretly somewhat pleased that we have to get different radiators, because it gave him the opportunity to choose ones that are lower to the ground and somewhat sleeker...

June 19, 2011

Progress: plumbing

Another major step forward this week: the plumbers have started work!

I was filled with foreboding on the first day, when they said they would stop by to plan things out and then never showed up--I'm still overly sensitive after what we went through last autumn. (See posts: Waiting and worrying, Waiting for G.C. and Screwed)

Happily, though, they showed up the next day to do the planning and then started work the following day, when they pulled up floorboards and started laying the pipes that will eventually carry gas and hot water (once we get the new boiler installed). We had to clear everything out of the living room and move the "table" back for them to do their work.


At least we get to cope with the disruption in stages: they are coming back over the course of several days next week to finish...

Just in case you think the roof is finished...

...it's not.

One might imagine that now with the slates done, the roof is finished...

...but unfortunately that's hardly the case.

There's still a long list of things that needs to be done before the roof work is officially finished, the scaffolding can come down, and I can go back to New York:
  • The Ridge tiles need to be installed along the sloping edge of each roof plane. These tiles are triangular shaped and cover the gaps where the roof planes meet (at one of the dreaded corners) with a bed or mortar. The tiles are placed on the mortar which holds everything together and seals all the openings. (You can see one of these ridge tiles sitting on the edge in the picture above.)
  • The eaves, which are plywood, need to be be protected from the rain so they don't rot away. They can either painted (which would mean they would have to be re-painted every few years), or - preferably - covered by a waterproof sheet (so they won't fade or need repainting).
  • The gutters need to replaced because we took the old ones out in order to remove the roof joists back in January as part of the structural work. Besides being in the way, the old gutters were metal and rusting away - it was only a matter of time before they started falling off...
  • There's a small area of re-pointing to be completed in the brick party wall over the flat roof.
  • The flashing needs to be completed along the brick wall - primarily where the flat roof is.
  • Once the flashing is completely finished, I need to apply a special waterproof caulk in the open joints where the lead is inserted into the brick. The caulk is formulated to bond between the brick and lead, but allows each to expand and contract properly - this avoids the problems associated with water getting into cracked mortar, which is the traditional way to seal the joint.
  • Our neighbors' TV antennas, which are cluttered along the face of the dormer, will need to be relocated.
  • And now on to the dormer - the first element of the dormer that needs to be done is all of the final exterior trim-work and facing. The plan is to do this with wood and then paint it (beacuse it will be easily accessible for repainting)
  • Once the dormer is trimmed out, the wood needs to be treated for exposure to the rain & damp weather with a protective coating for the wood. Once that's dry (2 days later), all joists and screw holes need to be patched with an exterior filler. After drying and sanding, the wood is ready to be primed, and then finally painted with 3 coats of black exterior paint.
  • Once the dormer is painted and finished, the final flashing/cap can be installed over the top edge. this will prevent water from coming in along the edge of the dormer where the slates stop. The trick with this is that the detail needs to span both types of roofing: traditional slates and modern membranes, yet look the same for visual consistency.
  • The vents for the boiler, kitchen exhaust and bathroom exhaust need to be cut through the brick wall in the rear and the vents need to be installed. This has to be done before the scaffolding comes down because otherwise there is no way to install the vents and patch the holes. The plumbers will do the boiler vents and I'll take care of the others.
  • The hole from the old boiler vent needs to be patched (once the plumbers take it down) - otherwise we'll have a 4" hole on the side of the building!
  • The windows need to scraped and painted (not replaced) because in a few years we would like to replace the windows with efficient double-glazed windows. 
  • Paint the exterior stone sills and other decorative stone elements that frame the windows. These are probably the most distinctive features of our building's facade.
  • The floor of the Juliette balcony needs to be poured in concrete. To do this, the wood form-work must be made, followed by the placement of steel reinforcing bars, followed by the brackets that hold the railing posts. Once all of that is done...then you can pour the concrete...
  • Once the balcony is poured and dry, the balcony railing can be installed.
  • Finally...the scaffolding needs to be cleared of all the debris that's piled up since November, and then it can be taken down by the scaffolding company!

June 18, 2011

Finishing the Roof Slates: small area, huge milestone!

Immediately after finishing the Dark Side, I walked to the back of the roof and got started on the only remaining area that needed slates - the little corner at the edge of the new dormer. This area is very small, but has an angled corner on one side and a small section of vertical wall on the other - which meant that it would be a huge pain in the neck.

And sure enough, it was. Besides the time-consuming angled cuts, the weather decided to be difficult once again. It kept raining on and off all day, so I'd get a little done, then have to move inside...this made the work go really, really slowly. I also had to keep going down to check on the plumbers, so I was only able to finish the roof portion, but not the wall. The wall only got done the next day.

But with that, we reached a major milestone - the slates are completely finished! The end of the roof work is in sight...
June 16 - before starting work
The first few battens in place
June 17 - installing the battens
The first slates installed
Starting the 2nd row - the vertical slate was used to locate the starting position (edge) of the roof
It was raining on and off, but managed to get a few rows up.
June 18th - Finished the roof slates, starting on the vertical wall
It's not many slates, but time consuming due to the cuts and hanging everything vertically
Almost every piece has to be custom cut.
3:30pm - Finished! Tired, but happy and relieved!

June 16, 2011

Our first "house"guest !

André arrived back in London last week, but this time, he brought with him a special visitor - his mum. Very improbably, she stayed with us for three nights on the construction site that we call home, so we can actually say that we have hosted our first visitor !

It was definitely a bit of a stretch in the sense that this place is not even really properly set up for us - never mind for a guest. In such circumstances, there was, sadly, only a limited amount we could do to try and make our visitor comfortable. But André's mum is an absolute master of resourcefulness, and in fact her myriad little touches went much further towards making the site feel a little cosier (is "cosy construction site" an oxymoron?!?) than anything we had bothered to do. A bright tablecloth for the improvised "table" in the living room (in reality, the table a long piece of plywood) and fresh flowers made more of a difference than I ever would have guessed! Full marks to her for creativity--not to mention for taking the air mattress and the lack of amenities in her stride.

June 15, 2011

Finishing Off the Dark Side (of the slates)

I've been calling the north side of the roof (facing the street) the Dark Side partly because it does not really get any direct sunlight, but mostly because it has always given me trouble. It's much smaller than its adjacent side, but it has the brick wall with all its flashing on one side, and the other long, dreaded corner. Also, its irregular shape means that towards the top, most of the slates need to be custom cut to the appropriate angle or size. I guess because of these factors, working on it has always taken me more time than I expected - and unfortunately completing it was no different...

I had hoped finishing this side would go quickly, maybe taking a day or two, but it ended up spanning over three days - not only because of the special factors mentioned above, but because on top of all that, the weather turned and it kept raining. The work involved required me to complete half a dozen rows of slates at the top, and then close up the long corner. As you can see from the picture it did not look too bad (at least that's what I thought). The first day went very well, with good weather, but then the weather started interfering.

So with the weather and all the irregular slates, the Dark Side continued to give me trouble, and completing it dragged on and on...
Morning of June 8th - the task ahead (did not look too bad)
First few rows of slates added
Final four rows
Reaching the top (finally)...
View from above
Laying down one of the last slates
For the last slate, you can see how irregular the space is, and the cut needed for the one below
The top row had to have each piece cut irregularly on the top to match the slope of the flat roof
The rows of slates completed...time to fill in the corner
June 15th - (morning) - after some time away, starting the last major corner of the roof
By the end of the day, I was more than halfway there, but it kept raining which slowed things down...
June 16th - With rain all morning, work only really began in the afternoon
The last row to be filled in.
Finished! With both sides completed, roughly 95% of slates are down
Montage of the finished slates

June 9, 2011

Modern vs. Traditional Roofing

After almost a month of dealing with business in New York, I'm back on the roof here in London. It's been good to have some time away, but the goal for these next few weeks will be to finish the roof and finally get the scaffolding taken down.

The first thing I'd like to get done is the roofing on the flat portion of the new dormer's roof. I'm doing this first to minimize the exposure to the weather of the new (waterproof) WBP plywood substrate which had been put down before I went back to NYC.

June 7th - the plywood substrate
The flat roof brings up an interesting discussion on the technology differences between flat roofing (which is a modern concept) and sloped roofing (which is the traditional way of building). Flat roofing only really started coming into use in the 1920's with the advent of modernism. Flat roofs have always been difficult to maintain, as they often leak - one early well-known use of a flat roof was by Le Corbusier in the Villa Savoye, which apparently started leaking as soon as the family moved in. Part of reason for this is that without a significant slope, water is not immediately drained from the roof surface, as it is in a traditional sloped roof - flat roofing relies on the chemical nature of the membranes and very slight, 2-3 degree slope to avoid water penetration.

Fortunately the technology has improved dramatically since then - these days, flat roofing products are petroleum-based membranes that are waterproof, like asphalt or modified bitumen. But they are sticky, smelly, and generally nasty! You're basically sticking together several layers of this (toxic) stuff to create the waterproof surface. Whereas the slates on the sloped roof rely on gravity to pull water down onto overlapping layers of natural (or artificial) stone that create an impermeable layer with very simple, but highly effective technique.

From a design standpoint, I much prefer flat roofs because of the freedom they provide in developing the form of a building. But from a hands-on construction standpoint, I find the slates a much more elegant and environmentally-friendly system. The biggest irony is that modern flat roofing membranes can last upto 30 years if properly installed and maintained, whereas slates roofs can last upwards of 300. So much for modern technology...

However, in this case we didn't actually have a choice: we had to use a flat roof on our dormer because otherwise we would not have been able to stand up inside, due to the height and design restrictions imposed by the Planning Dept (which are more onerous because we're in a historical conservation district). As a result, we needed both a sloping slate roof, and a flat modified bitumen roof. Going into this, I had not really considered the issues and detailing involved with having both systems adjacent to each other - particularly the flashing that spans both systems.
Working out the details in my sketchbook
After much thought, sketching and research, I developed several details how to do this (after not finding any details anywhere). With the new details in hand, it was time to start the flat roofing:
June 7th - one of the new flashing details. The plywood overhangs the last slate, and lead covers the joint. The top of the lead is held by a batten that will be covered by the waterproof membrane
June 9th - Applying the primer for the two layer roofing system.
Fully Primed
Rolling out the 1st layer, which has a sticky bottom side that adheres to the primer.
One roll adhered and starting the second
The protective paper removed from the 2nd roll, ready to be attached to the primed plywood.
Running the 1st layer up the brick wall.
A roll of the cap-sheet (the top layer)
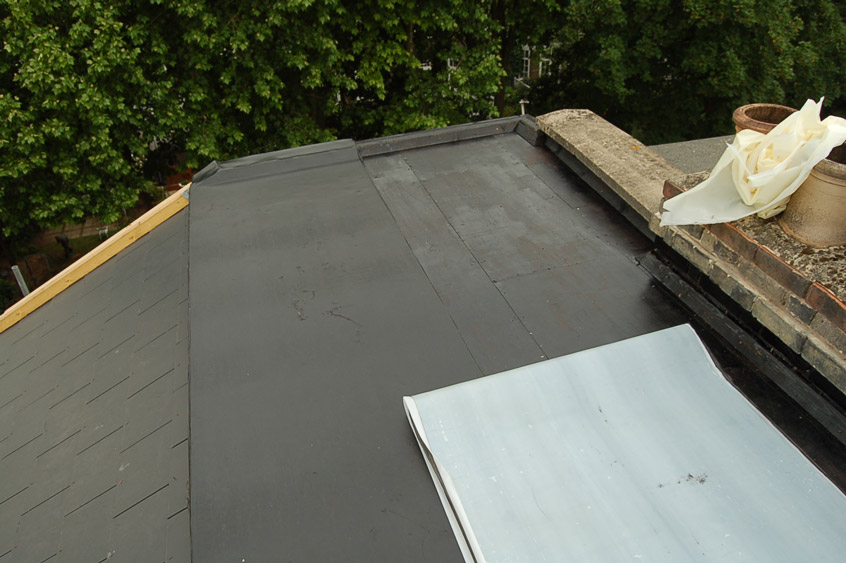
The cap sheet wraps around the batten to provide a drip-edge for the flat roof, and to make the edge waterproof.
With the edge finished, the 1st roll of cap-sheet is laid-out
Half the cap sheet installed - it also has a protective paper that is removed to expose a sticky surface that adheres to the bottom layer.
Doing the 2nd roll.
The details along the wall are tricky and time consuming.
Wall details finished - they will be covered with a lead flashing.
The finished flat roof!

June 4, 2011

Homecoming?

I'm just back from a week in New York. It was 25 degrees (C) in NYC, with gorgeous sunshine, and I arrived back in London and it was 12 degrees and pouring rain. And after staying in a proper flat/home for the past week (with a kitchen! And a real bed! And hot water! And...), I returned to the construction site and "the Box".


But...astonishingly - "the Box" feels like home. And, amazingly - I found myself happy to be back, and in fact not really missing any of the "creature comforts" (well, by most normal standards, basic amenities?!) at all !


Let's hope that lasts - André joins me here in a few days, and we're in for another couple of weeks of hard work...